Cryptolocker is not a virus, spyware or even ransomware: Cryptolocker is the New Model [UPDATED]

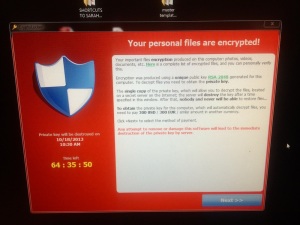
cryptolocker splash

[NOTE: Since I wrote this I have been getting calls from pretty much around the world. Which is weird and funny and crazy—particularly considering the differences in time zones. I am prefacing my cryptolocker experience with answers to the most commonly asked questions. Hope it helps. Again, I am not advocating paying the ransom. That is your decision. If you are compromised by crytolocker and you have files that are valuable/irreplaceable and you don’t have backups, you will have to make that choice.]

[ADDITIONAL NOTE: Time is of the essence. Do not put off to tomorrow what you can do today. This is not an exact science. Immediate response is of the utmost importance to insure infected files have the highest likelihood of (reasonably) affordable recovery. DO NOT WAIT—ACT NOW.]

UPDATE #1: “How do I re-infect my computer with Cryptolocker?”
Link is copy of Crytolocker here. Warning: it works.

UPDATE #2: “What if I ran out of time and my files are still encrypted by Cryptolocker?”
You can gain some time back by changing date in bios.
If you don’t know how, google your computer make (HP, Dell, Acer, etc), model (DV6, Inspiron 15, etc), and phrase change date bios. It should come right up.

UPDATE #3: “It won’t let me reinfect my computer.”
Turn off your antivirus and disable your antispyware. If you have Norton, use the Norton Removal Tool.

UPDATE #4 [3.27.2014]: If your antivirus/antispyware removed the CryptoLocker virus, and if you are tech-savvy, you no longer have to reinstall CryptoLocker. Instead, you may install Tor and use CryptoLocker Decryption Service at f2d2v7soksbskekh.onion/. From there you upload an encrypted file and it does a search for your public key. If that sounds tricky, get assistance before proceeding.

UPDATE #4.1 [3.27.2014]: Also, a recent computer security survey by UK’s University of Kent revealed that 1 in 30 computers have been infected with CryptoLocker, with 40% paying the ransom. If that number has a scaleable throughout the West, than CryptoLocker has already scammed  100’s of millions of dollars. If one million people paid the ransom, that’s $300 million! In other words, comparable ransom money to that of a small nation’s GNP. And it’s still going on. So yeah, this is crazy.

UPDATE #5 [4.3.2014]: Over the past week it’s been busier with an updated Cryptolocker virus. Vector remains same: zip file from email. Rule #1—DO NOT OPEN ZIP FILES IF YOU HAVE ANY DOUBT. It is something that every person in organizations should have explained. NO ZIP FILES. In any case, as ever UK professionals are adamant about not paying ransom. Noble but wise? Or possible? When it’s your files life changes.

UPDATE #5.1: This has to do with managing a Bitcoin transaction. An unusual corporate setting with a key individual savvy/confident enough to manage Bitcoin transacted 24-hr CL decrypt without any previous knowledge of Bitcoin (usually I reinstall virus and use Greendot Moneypak). However, aftewards he was spent. Why? Because getting Bitcoin is only remotely like any other sort of transaction ordinary people are used to. It’s actually mostly unlike any other type of ordinary transaction.

You should know: Knowledge of Bitcoin is not easily attained. Neither is quick purchase/trade of Bitcoin. However, in order to make it happen, you have to 1) prove to Bitcoin seller your identity is legit, and 2) move smart & fast because time is of the essence.

This is important: You will not have to meet in person but you will have to convince a total stranger that you are not trying to scam them. (Being googleable, being from a legitimate company, and having an established business domain email address are all a good start but by no means are any guarantee.) If such steps are not easy to manage, bring in backup in the form of some trustworthy geek. In fact, as this is only the first of this new type of attack, it’s a good idea to acquire some Bitcoin preemptively or at least find out who you know knows Bitcoin well enough to pull off a transaction within a very short window of time. Most Bitcoin transactions take time. Time is not a commodity available to someone infected with Cryptolocker. (Yes I know you can reset the clock in BIOS. Works sometimes.)

Update #5.2 9 [4.3.2014]: Cryptolocker now deletes shadow copies.
Bj_f-6gIYAAr7hc
So: Do not waste valuable time going after shadow copies if you are planning paying the ransom/going Bitcoin route.

UPDATE 6 [4.4.2014]: This is an excellent article on what to look for if your computer was infected by CL. I particularly like this list of vector emails which deliver the Cryptolocker. Worth reading/showing employees, family, etc. These emails all share one thing in common: they all come with a download. So: Do not download iffy email attachments. DO NOT OPEN ZIP FILE IF YOU HAVE ANY QUESTION ABOUT IT:

  • USPS – Your package is available for pickup (Parcel 173145820507)
  • FW: Invoice <random number>
  • ADP payroll: Account Charge Alert
  • Important – attached form
  • FW: Last Month Remit
  • McAfee Always On Protection Reactivation
  • Scanned Image from a Xerox WorkCentre
  • Annual Form – Authorization to Use Privately Owned Vehicle on State Business
  • Fwd: IMG01041_6706015_m.zip
  • My resume
  • New Voicemail Message
  • Important – New Outlook Settings
  • Scan Data
  • New contract agreement.
  • Important Notice – Incoming Money Transfer
  • Notice of underreported income
  • Payment Overdue – Please respond
  • FW: Check copy
  • Payroll Invoice
  • USBANK
  • Symantec Endpoint Protection: Important System Update – requires immediate action

Ok,
Ready to have your mind blown?

For the past 24-hours something took over a friend’s PC computer which encrypted all 11-years of business files. The friend unfortunately did not have any backup and the thing that took over the computer deleted all earlier restore points on the PC (running Windows 7). Then a little virus—with a timer—popped up and announced all files were encrypted and could only be decrypted for $300. Furthermore, if the money was not paid within 95 hours the decryption key would be destroyed. Meaning, all the files and data would be lost forever.*

And the thing called itself Crytolocker. (See below.)

After an entire night of research with other experts and people who are a lot smarter than most of us, I learned Cryptolocker was genuine extortion. Meaning it delivered what it promised. If you paid, people and businesses reported their files were released. Most chilling was the fact the two of the top architecture firms in NYC had been attacked. It encrypted every computer on their network (!) and the firms both lost one solid week of work (they backed up weekly). “Imagine,” it was reported, “how much money and humanhours this represents. Maybe in the tens of millions.”

With that in mind, our next step then was bold: We paid the $300 ransom.

Unbelievingly the program actually did what it promised. The files were decrypted. We recovered the files. All of them.

At this time, I just have three things to say. The last is the most important.

  • First, update your Windows** antivirus, antispyware, and java program.
  • Second, do not open any attachments that come as .zip files. I have asked my wife at this time to not open any mail attachments at all. None.
  • Lastly, most important, backup your files and data to an external harddrive or an offsite location. I do both: backing up to external harddrives (available at OfficeMax etc) and setting up Gillware exclusively for my off-site backups.

As you know, I have been hands-on computers since 1979. Cryptolocker is unlike any attack I have ever seen. So you know, it is not the “FBI has taken control of your computer” virus. Everyone asks that. It is not that.

Now I am talking with  Congressman Joe Garcia’s office and the FBI have bumped me up to the next level. My guess is Cryptolocker will be front page news within the month if not week.

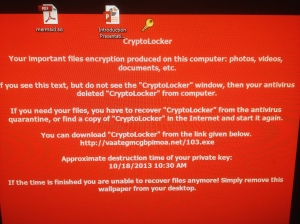
I will tell you more as I have more. One thing, if you get Cryptolocker do NOT erase it off your computer. (If you have another IT person, they may call me.) You will need it to get your files back. In fact, the virus after being deleted leaves a message on the desktop explaining as much.

cryptolocker

When people say, “Watch out for the Cryptolocker virus” they are confused. It is more than a virus. It is an brilliantly executed act of high-tech extortion using tools that are outside of the ordinary computer user’s hands. This is science-fiction. This is the new model. And as of two days ago, it is reality.

Head’s up. Call if you need, back up your files today. And you may want to buy a Mac**.
Mike Mongo
305-304-1555

* Please note the encryption is an assymetrical encryption. It requires two keys, one in the virus on the computer, they other on the Cryptolocker server. The key on the Cryptolocker server is 1024-bits long. Along with the key from the virus, it is unbreakable. Not even brute force decryption can undo the encryption. Removing the virus only leaves encrypted unusable files.

** Macs are safe, as are iPhones, tablets, and Android devices. Cryptolocker only affects Windows computers.

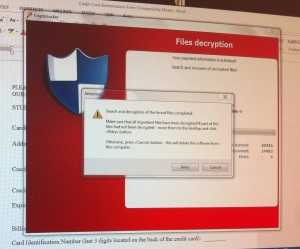
UPDATE: We paid the $300. There was a 2-hour wait, then decryption started. It took 8-hours all-in-all, and 14,400+ files were decrypted. It worked. All the files were decrypted.

cryptolocker decrypt

The PC has now been been backed up, doubly reinforced and my friend is presently actively switching to Mac.

But the most noteworthy thing: It worked. This was extortion, plain and simple, and it worked. And I and my friend and her entire staff were overjoyed. Classic Stockholm Syndrome responses. However, the other option was terrible. My question is: what are the attackers using the money for? It’s all too well-conceived to be ordinary. The conversation with FBI continues. Stay tuned.

Posted in Uncategorized | 12 Comments

Broken Android touch screen—can’t unlock: SOLUTION

Broken Android Touch Screen—Cannot unlock SOLUTION!


This was a trick. How to open an Android phone, in this case a Tracfone ZTE 990G—though it could just as well be a Galaxy II, III, or IV, or and HTC One, or Motorola Defy and so on—when the touch screen doesn’t work? The great thing about this solution is the screen could be cracked or the “touch” could just be not working, as long as you can see the screen you should be good.

Now first a head’s up: I cannot unlock a locked Android device. But what this explains is 1) how to reset phone but save your files. Again: This is is instructions how to save your Android device’s files photos music videos etc. Which is really what matters. That way you get your data (WOOT!) and then you can reset your phone to get rid of screen lock.

NOTE: If you really need to get into your phone you will just have to replace the screen. If saving your files is good enough, you are in the right place.

You will need a PC and to be able to plug your device into the PC. Note: I have no idea if this works with a Mac. Note 2: I make no guarantees other than I read that someone on the internet had done something like this by accident and it worked. So I reproduced the actions and it worked for me. Note 3: IMPORTANT—this may not work for you. If you really need the data then don’t fool around and send the phone away to a professional recovery service or get the screen repaired.

IMPORTANT: My phone said USB debugging enabled before I began this process. It always said “USB debugging enabled” when it was started. This mattered later I believe. I get lucky like that. A lot.

Here’s what I did. First, figure out how to go into Recovery mode. In the case of the ZTE 990G, it was key combo [volume up + power + option] which did it.

(Though sometimes just [power + volume up] or [power + volume down] will put your Android phone into Recovery mode, as well. It’s one of those things.)

In Recovery mode, you will see 3 options:
-Reboot
-Wipe data/factory restor
-Wipe cache partition

It’s the third one that’s the charm. Now when you do this, there will be a warning. Something along the lines of “deleting all user data” kind of thing. If you are like me this probably seems pretty unnerving at this point. But I had nothing to lose. The data was wanted by the phone’s owner but they had no options other than to ask for a favor if I could save the data. And it just so happened I did!

Okay, here’s what to do. Select “wipe cache partition”. You will be brought to a window that looks like:
ARE YOU SURE YOU WANT TO DELETE YOU USER SETTINGS & DATA?
No
No
No
No
No
No
No
No
No
Yes
No
No
No

So if you are bold like me you will choose “no” and repeat the process a couple of times. Because actually when it comes to screwing around with losing data I am a natural scaredy cat.

[…hey! Oh by the way did you read this part earlier:
“IMPORTANT: My phone said USB debugging enabled before I began this process. It always said “USB debugging enabled” when it was started. This mattered later I believe. I get lucky like that. A lot.”

…so just a reminder. You may want to make sure this is on on your device or phone. Simple googling—ie android galaxy usb debugging—can be very informative. Okay back to the process… ]

But eventually if you are like me you will human up and pull the trigger.

“Yes”

There are a few lines of script then back to the 3 choices.

At this point make sure your Android phone or tablet is plugged into your PC. Do this before you press reboot.

Ah, in case you missed that. Because what I said is: NOW make sure your Android phone or device is plugged into your PC. Got it? NOW is that time.

Before you press reboot. K? K.

When your device/phone/tablet is connected to your PC then do it. Scroll to the “Reboot” option and select it. Phone (device) will reboot.

Depending on your device’s startup time, a screen will soon appear on your Android device/phone that says “Turn on USB debugging”. Select it/yes.

Now look on your PC.

On your PC that gives you the option appears to “Import Pictures and Video” or—hey are you listening?—“Open folder to view files”.

Do that: select “Open folder to view files”. A window now opens revealing on the precious files. Now is the appropriate time to move away from the PC and Android device and jump up and down for joy. Or just give one of those Success Kid fist pumps.

Be sure and look in every folder for your files. Or why fool around, just copy the whole thing.

This is how I did it. Hope it works for you!

PS I haven’t looked to see what’s on the phone yet. But my friend’s files are saved and that’s what matters. #WOOT

Posted in Uncategorized | 1 Comment

Expert-Exchange


Large Experts Exchange VIP Badge

See that link above? For posting it, I get a free t-shirt. It’s a pretty good shirt too otherwise this would have gone nowhere.

Not that I wear a lot of t-shirts. But the right t-shirt in the right place counts for a lot.

Regardless, I actually use expert-exchange. Not always but on and off. It’s a pay-to-play, subscriber service so there’s that. But it works really, really well. It’s kind of like a very pricier geeked-out version of ask metafilter. (Metafilter is just the one-time $5, but is not strictly computer repairs (to say the least).)

Anyhow, I’ll probably re-up as a result of this promo. It’s a beta version of an updated experts-exchange. If they do it right, I want to be there. Because if they make it actually better than it already is e-e will pretty much be mandatory.

We’ll see. Stay tuned.

Posted in Uncategorized | Leave a comment

HP dv6910us take apart dissassembly manual

Only because it was a friend did I work on this computer. First of all, of all the laptops I have worked on ever (so far), none do suffer more problems from overheating than HPs.

Think that’s all? Hardly. HP laptops are so prone to completely being bricked as a result of these problems that it’s safer to bet that any given HP laptop will be come useless after only a couple years use than to bet that it won’t. The only way HP has got away for all these years of producing laptops with cpu’s (and motherboards) with critical inherent heat dissipation flaws is to NOT ACKNOWLEDGE THEM. HP does not own up to these problems.

Done yet? No. Because not only is that all terribly true but then there is the challenge of locating manuals. The HP support sites are ridiculously complicated and bloated with useless “features”. In a way, this is exactly like their laptops.

The HP Touchpad didn’t fail because of bad management. It failed because it is an HP.

But wait there’s more! And it is the take apart for the HP DV6910us. What a monstrosity! It is less an engineered machine and more a form of puzzle. Add to the puzzle the arcane instruction manual—of which I give no small thanks that AT LEAST there is one!—and the affair becomes less like computer repair and more like and Alternate Reality Game.

The reason I am posting this is so other who need to get inside this machine (hint: get a new computer) have less of a challenging time than I did.

Here are some clues.

1. In order to get to the fan, pretty much everything has to be removed.

2. There are a hell of a lot  screws. Most are useless.

3. There are a hell of a lot of difficultly-placed ribbons and cables. I mean, acknowledged, the engineering of this beast is amazing. As long as one does not have to take it apart, it’s like a faberge egg. However, since it’s an HP chances are one will have to take it apart.

4. Everything including the display. The display has to come off.

5. The fan is sort of the last piece in the puzzle.

6. Plan on an entire morning to make this happen. Four-to-five hours.

7.  You will have plenty of left over screws.

8. Re-seating the fan with new thermal compound won’t fix the problem. It will still just fade quickly and restart immediately after completely booting up.

Here’s thHP dv6910us manual. HP, you totally fart.

Posted in Uncategorized | 1 Comment

How to fix windows\system32\config\system error on XP using ultimate boot cd 4 windows [SOLVED]

First of all, this really works. And it works really well.

But I have to say t has been two months without my laptop or the data. The data was safe (I pulled the HD and checked that) but I couldn’t get the laptop to boot past the infamous “windows\system32\config\system” error.

It would not boot into safe mode. As usual, “last known configuration that worked” did nothing.

Worst of all, the XP install disk would go to Blue Screen before I could run either “r” repair or install to use the repair function there: After f8 it would Blue Screen.

So I was stymied. No, I was frustrated!

But one night after a particularly trying week where nothing seemed to work on anything, I said to myself before getting home, “I’m going to fix that windows\system32\config\system error on my laptop”. And I set my mind to doing it.

My plan was to build and use a BartPE (pre-install) disk. But for for some reason I always have a challenge making that happen. I remember the first (and last) time I successfully built a BartPE disk or USB thumb drive. It took hours and hours. When it worked I felt as if I had actually accomplished something. Like a boss.

It was a good feeling. Then I lost that disk or thumbdrive. So back to square one.

Anyhow, once again I kept on having impossible difficulties creating a BartPE disk.

Thankfully, I googled replace windows system32 config system usb and I landed on this page. It’s a list of fixes. Option 5 being “Using BartPE” but it led me here.

Using the instructions on that page I created an…

Ultimate Boot CD for Windows!!!

…and how appropriately named. Yes, there’s a PayPal donate button. Yes, I got a chance to use it. But not before a couple of other steps.

The first thing I did was load the disk on my laptop. It takes a few minutes but it works like a charm. Then I googled windows system32 config system “ultimate boot cd 4”

I got this.

After scrolling down, I got to the part about Registry Restore Wizard (aka RegResWiz).

RegResWiz allows you to load older saved copies of the registry. Which I did. I went back about five days. Then I finished, restarted (“restart w/eject”) and watched and prayed.

And voila! It came right up! I was blown away. Beautiful. (At this point I went to the PayPal link at the ubcd4win site—heck yeah I’m supporting that cause!)

So there you have it. How to repair windows\system32\config\system error on XP using ultimate boot cd 4 windows. As promised. It really works!

Posted in Uncategorized | 5 Comments

How to replace MacBook 13″ CMOS battery. Also: How to replace MacBook 13″ internal battery. AND: How to replace MacBook 13″ back-up Battery. LASTLY: How to replace MacBook 13″ PRAM battery!

Crazy title, right?

I would ordinarily think so. Except I did more than a few hours googling for Macbook CMOS battery replacement info, after which I only felt frustrated.

It was less than fun. And when I figured out the key phrase which paved the way to a single link within a random thread with the answer, I felt obligated to help post in a clearer manner. It was “Macbook 13” pram battery. The thing is called a pram battery.

There have got to be many people who have found themselves in this same situation, dead or failing pram battery. The reason I did was a cousin’s girlfriend’s white 2008 MacBook 13″ had the “infamous 9-beep” problem. The only solution for this (unless it heals itself—which is rare but happens) is to “replace the internal battery”.

Only no one mentions where it is or how to do it.  Even so, you can buy the thing: Parts # 922-8266 or 922-7369 depending on what year model. So after buying one, what was I to do?

I went and took it apart. And then I put it (successfully) back together. And then I googled some more because I couldn’t understand how it could be so difficult to find the answer.

It turns out it is just like this: This is the disassembly for the MacBook 13″ pretty much spot-on. (Again, I found this by googling “MacBook 13″ pram battery.)

So now you can replace the MacBook 13” CMOS battery/battery too.

Remember this IMPORTANT REMINDER: You are removing the fan assembly so you will need to have thermal heat sink compound on hand. (Easy to replace, just use a half-a-raisin size dot of it, about three bb’s worth.)

And that’s it. If you have any questions, feel free to post. It was a very difficult process the first time—and there a bunch of wires which have to be neatly put back into place but even that’s not too bad—but after getting the hand of it with some instruction it’s not too bad at all. Nonetheless, I’d block about two hours for it and keep careful track and order of my screws. (There’s a bunch!)

Posted in Uncategorized | 2 Comments

Shipping Recycled Computers to Primary School in Jamaica

From the email I sent out:

Here we go again!

For three years now, we have been rebuilding and repurposing discarded PCs and supporting a school in Jamaica called Brampton Primary. Just three months ago we sent another shipment of discarded and unused old model PCs to Jamaica.

It’s a labor of love. How it works is from donated unused and discarded PCs we rebuild and reuse them in the Brampton community. For the most part, these are computers which are on their third and fourth lives, or else too old for kids here on the island. (Though, this last semester here in Key West we gave away six computer workstations to deserving Key West students.)

How I fund this is by doing computer repairs. My company, Computers Are My Life, regularly charges $80 an hour for service calls and repair.  When we ship, I offer a computer clean-up and repair special to pay for the shipping and transportation of the PCs.

This is the special: Buy two hours for $100 that you use whenever you want. Save $60 and you may use it now or save it for a rainy day. Keep it like virus or spyware insurance policy. I have a lot of happy customers of the past three years who have helped to support this program. It’s a win-win-win. (You, the kids, and your computer.)

These $100 certificates are good for whenever you need. I am flying out April 22 and will return May 9.

Your support for this project means to the world to about 92 students in Jamaica who have computers because of all of us.

Thanks, Key West. Keep up the good work!

Mike

And here is a PayPal link for donations.

It was requested and that’s the kind of request which can seriously make a world of difference.

Posted in Uncategorized | Leave a comment

What do I do for iPhone water damage? What do I do for saltwater cellphone damage?

UPDATE 3.15.2013: Be sure and read the comments, there is a ton of good information from other people who have gone through getting their iPhones wet. Thanks to all!

“Help! My iPhone got wet! WHAT DO I DO??”

No worries. If your iPhone got drenched, here’s what to do.

The first thing to realize is that the instructions below apply to pretty much all electronics: iPhones, Blackberrys, Syncs, LGs, iPads, laptops, netbooks, the works. “What do I do if I got my stuff wet?” “What do I do about salt water?” These are great questions and the key here—particularly with salt water damage—is to respond quickly.

Salt water in particular is a threat. But first things first, what if you just get it “wet”.

If your phone gets “dampened” with water, dry it off. If you believe the water got inside, you may want to do more. (Particularly if it is an iPhone 4 due to their relative sensitivity to moisture. The other iPhones seem a little more water tolerant.) Here’s what to do.

The very first thing to do: POWER DOWN. If possible, take you battery out. (It takes a special TS1 “pentalobe” screwdriver, not commonly available but you may be in luck if you live in a big city or if you have friends who are fully-geeked.) If the device has shut itself down, don’t worry. But make sure it is off. And again if possible remove the battery.

Next, shake the water out. Vigorously, for several minutes. The more water that is released this way, the less that is still inside sitting around. Now, BE CAREFUL to NOT LET GO while doing the shaking. Too many times, people release their device while shaking out the water and do worse damage than water damage. Just hold on tight. (What I do is grab a hold of the device with real thought and intent LIKE I AM REALLY DOING SOMETHING (like smacking a rug with a stick) and then swing my arm down in that same way: consciously and with intent. Do this for several minutes. Switch the device around in your grip so the water has different ways to get out. Try it with the main port facing the ground. Then the side. Then the main port again…

After all the water is out that can be “squeezed” out, the next step requires white rice and a container which is preferably sealable. Like tupperware or glassware. Ziplocs do work but they are less than airtight. (Freezer bags are better.) Even a plastic grocery sack or couple of newspaper bags will work in a pinch but the more airtight you can make it the better, and plastic bags tend to “breathe”.

Why white rice? It’s more absorbent. Uncle Ben’s/instant rice is not the best, though. That’s kind of fake rice and it doesn’t absorb as well because it gets soggy quick. But again, in a pinch even this will do.

What to do is place the device in the container or bag and pour the rice over it until it’s covered. Keep this in mind if this is a laptop, it’s going to take a lot of rice. Otherwise, just make sure your device is surrounded with rice. If the battery is removable, make sure the battery is OUT. Don’t skimp on the rice, rice is cheap.

Now comes the hardest part: Put the container or bag away for 24-hours. At least.

I prefer to wait a full 48-hours because my electronics are worth it. Especially data devices such as smart phones. I roll the rice a few of times each day—every four or five hours or so—just to move drier rice around the device.

After this work, open up the container or bag, install the battery, and power up. Chances are it is really going to work. Which is really a great feeling. I mean REALLY great…

…however, if the phone is still not working believe it or not there is still hope. The key is is to plug in your device and charge it for an hour or so. It may come right on BUT EVEN IF IT DOES…WAIT! Let the device sit and “juice up” for a while (an hour or longer). For some reason, this seems to make a big difference in the long-run. In any case, the electricity makes the device happy.

SALT WATER

Salt water is a different ball game. Salt water is like acid to electronics. VERY BAD. Here’s what you have to do, and fast.

That’s right, fast. The key to success with treating electronic’s exposure to salt water is reaction time. And that reaction is to rinse the device in FRESH WATER.

“What??” you ask. That’s right, rinse in fresh water. Even a diet soda is better than salt water. (Sometimes the closest thing to fresh water is Sprite Zero. Sugar sodas on the other hand would be a no-go.) Salt water eats electronics like wet eats tissue paper.

If you get your device dampened by salt water, a quick swish of fresh water and some wiping and shaking may do the trick.

If the device is doused in salt water, however, the only treatment is a fast complete rinse down with fresh water.

(If you only have a limited amount of fresh water: First remove battery (if possible) and rinse off salt from device with fresh water. Than swish device in cup of fresh water. Than shake water out as much as possible. Than wrap in towels. Put in plastic bag until full rinse and rice treatment can begin.)

To start with, remove battery (if possible—as I said above, it takes a special TS1 “pentalobe” screwdriver) and rinse device under fresh water. When I say rinse, I mean drench. Just put under a faucet and then shake out water, then do it again. And again. Get that salt out. Better yet, put in a bowl or bucket of fresh water, turn upside down to let air out from bottom, and shake.

Next, proceed as you would after exposure to fresh water as described above. Since the phone has been completely immersed in fresh water, let it stay in the rice for the full 48-hours. Move the rice around several times to bring the drier rice closer to the device so that it may better draw the moisture away. You can even switch out the rice with fresh dry rice after the first 24-hrs. Be patient.

A word of caution: Some people have used isopropyl alcohol instead after exposure to water. My own experience is that this causes other problems (such as permanent discoloring or fogging of screen; melting of some plastics and rubber; etc.). If isopropyl alcohol is used, your results may vary. My experience is that clean water dries easy.

And that’s it. If you follow the above, chances are you will have a properly working device which continues to serve you well.

Mike Mongo
Computers Are My Life
Key West

Posted in Uncategorized | 189 Comments

Vista has been causing many of my clients many problems recently. SO many I have begun to wonder about “built-in obsolescence”. Vista started poorly and is aging worse. (Fortunately, the opposite is true of XP though Windows 7 seems to be a long-term winner.)

In any case, a friend’s Vista-based HP Slimline unit developed some weird hiccup including some strange “Bad Image” error message after start-up,  along with a “Fax Man Server has stopped running” message.

Googling Vista Bad Image, I got this.

The instructions were simple.

Go to Start, then Run…

Type in cmd for a command prompt/command window.

Type in “sfc /scannow” (no quotes, include space after sfc). Press Enter. Follow directions. (I was told to restart and do it again. On the second go it ran. And ran. And ran…)

Scannow will takes some time. As in possibly hours. But it did fix the errors. Most of them. So I ran it again.

Yet there will some errors Windows said it was unable to repair. Having already run System Diagnostics, I knew that the hardware (harddrive) was okay.

Googling vista scannow, I got Microsoft Support doc 929833.

It explains what to do with errors which “cannot” be repaired. Cool.

Then for the capper, I removed all the Lexus software. (Somethiong called ezprint.exe was having an issue. And Fax Man Server, too, both kept on quiting. It all seemed to be coming from the Lexus software.)

Lastly, I ran AVG PC Tune-up 2011, which is expensive to buy but gives you a 24-hr run as a freebie.

And now the computer is running great!

Posted in Uncategorized | Leave a comment

Single, loud, short beep at start-up Dell

Here was the situation. The computer had been overcome by a virus, which I got rid of with help. And in doing so at some point at start-up, just before sign-in or logon, a beep would sound.

It really wasn’t a big deal. And everything I read said that it meant everything was functioning properly. But the person whose computer this was would buy another computer rather than deal with that loud beep every time the computer started up.

In googling dell inspiron 1520 loud single beep users logon, I came across this.

There is a setting in device manager. (Go to My Computer, right-click, choose properties, then hardware, then Device Manager)

Under device manager, in the menu choices click on view.

Click Show hidden devices.

Click Non-plug and play.

Right-click Beep. Select Disable.

You will receive a warning. Press OK. Then it will suggest you restart.

Restart.

Then, voila! Beep gone. Good one. Thanks, jshadoww.

Posted in Uncategorized | Leave a comment